Model of the Russian SOYUZ Booster
In the Model Information Section, you will find drawings of the Soyuz booster. The information are there for a 1/48 scale model and all sizes are in millimeters. You will also find in the detailled drawings, numbers that correspond to the thickness of the details.
1 corresponds to a detail that has the tickness of a sheet of paper
2 corresponds to a detail that has the tickness of a sheet of cardboard
3 corresponds to a detail that has the tickness of a 1 mm balsa wood
Colors are also indicated and I hope you can translate the French words that are used here. Maybe 1/48 is too big a scale for you, in that case you can reduce the size and the dimension using the "Rule of Three".
Règle de trois (Rule of Three)
How to convert the dimensions if you want to build a 1/100 model ?
As an example 169 corresponds to the height in mm of the higher part of the second stage. The real dimension is 48 times bigger : 169 ´ 48 mm ; for a 1/100 model the dimension will be 100 times smaller : (169 ´ 48) / 100 = 81,12 mm.
Developing a cylinder
The Soyuz booster is composed of cones and cylinders, we need to know how to develop a cylinder in order to build it.
The cylinder case is simple and well known, once developed it is a rectangle whose one side is the height H and the other side the perimeter P. The perimeter can
be calculated from the radius of the cylinder : P = 2 ´ p ´ R where p is about equal to 3,1416.

Developing a cone
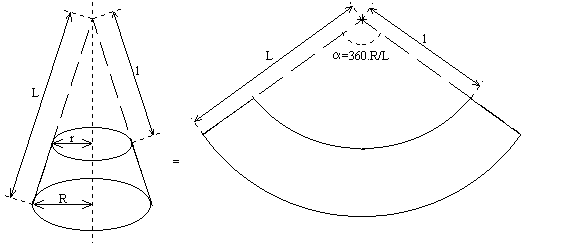
Developing a cone is more complicated but terribly necessary for a Soyuz booster. A cone can be developed as a piece of a circle. The radius will be the height of the cone.
The circle piece will have an angle a function of the lenght L and the radius R. The relation between these three values is given by : a = (360 ´ R) / L where R
and L are in the same units (mm, inches etc..) and a is in degrees.

Building a cylinder or a cone
To build a cone or a cylinder, you refer to the previous sections for determining R, L or H. Then you draw on cardboard the developed cone or cylinder.
The developed cone or cylinder is then rolled. To close it you can use adhesive tape.
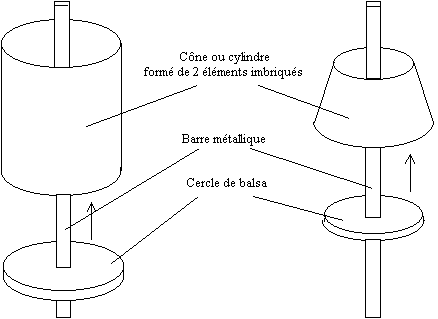
In order to have a good rigidity you can stick inside you cone or cylinder an other cone or cylinder. If your cardboard is not very strong you can stick a third one. Of course the radius of your inside cone or cylinder will be a slightly smaller. Once glued you will then have 2 or three layers of cardboard, if you need to make an opening (to view the Soyuz spacecraft for instance), the cone or cylinder will then keep its shape.
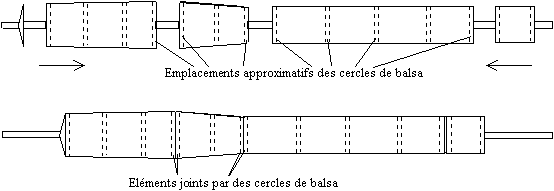
Inside the cone or cylider you will need to insert circles of balsa (every 5 cm on the Soyuz booster). This will insure rigidity and you will be sure that your cylinder
section is a circle and not an ellipse. These balsa circles can also be pierced in order for a metal bar to penetrate all your rocket. This bar will have two roles:
insure a perfect alignment of the various elements of the rocket, allow the rocket to be installed on its base.

Once the various elements are built, your will assemble them using wood glue. You must be sure a balsa circle is placed at the extremities of each elements.

Finishing stages and the shroud
Once all the elements are assembled, it is necessary to smooth the surface before installing the details. In the end the surface must be clear of imperfection and smooth as plastic or resin. You can smooth the surface by using plaster that will fill all imperfections and holes and sand paper, then you paint the model with wood finishing coating.
This process must be repeated 3 or 4 times before you have a perfect smooth surface. you can then add the details and again use wood finishing coating over the detailled surface (again 3 to 4 times).
In the end your surface will be like one of a plastic model and you can paint it just like you would paint a plastic model.
Vincent MEENS